

Table of Contents
- Why a Pre-Trip Inspection Beats Hoping for the Best
- Your Camping Gear Inspection Checklist, Item by Item
- How to Check If a Tent Is Waterproof Before You Leave
- How to Test Sleeping Bag Warmth at Home
- How to Test a Camping Stove Safely
- Simulating Rain, Cold and Loaded Use in Your Backyard
- Setting Pass/Fail Criteria: Repair, Replace or Warranty
- Frequently Asked Questions
Last Updated: October 18, 2026
Why a Pre-Trip Inspection Beats Hoping for the Best
Most camping gear quality failures happen at the worst possible moment. A zipper splits at dusk. A seam weeps through the night. A pole cracks in wind. Every one of those problems was findable at home, before you left.
Checking camping gear quality before a trip is a habit, not a chore. It turns guesswork into evidence. You look, you test, you decide. This guide from Budget Roo Pty Ltd walks through seven checks you can run in an afternoon.
The core rule: test gear the way you'll use it, then judge the result against a clear pass or fail line. No gut feel. No hoping.
Your Camping Gear Inspection Checklist, Item by Item
A camping gear inspection checklist keeps you honest. Work through every item, in the same order, every time. That repeatability is what separates a real inspection from a quick glance.
Here is the sequence we recommend:
| Item | What to Check | Time |
|---|---|---|
| Tent | Fabric, poles, zippers, seams | 15 min |
| Sleeping bag | Shell, baffles, insulation loft | 10 min |
| Backpack | Straps, buckles, stitching | 10 min |
| Stove | Hoses, seals, flame | 10 min |
| Lighting | Batteries, seals, switches | 5 min |
| Water treatment | Filters, seals, flow | 5 min |
Tents: Fabric, Poles, Zippers and Seams
Start with the fabric. Hold it up to light and look for pinholes, tears and worn corners. Small holes grow fast under tension.
Next, check the tent poles. Assemble every section and feel for splinters or cracks. Run each pole through its pole sleeves and check the pole connectors seat fully. A bent connector will fail under load.
Then test the doorway zippers. Open and close them fully, slowly, listening for catching teeth. Check the stitching around the zip tape. Loose stitches mean a repair before you go.
Finally, inspect seam tape and waterproof coating. Peel back a corner gently. If the tape lifts easily, it needs resealing.
Sleeping Bags, Packs and Load-Bearing Straps
Unroll the sleeping bag and lay it flat. Look for tears in the shell and clumps in the insulation. Clumping signals cold spots ahead.
Check the temperature rating on the label and compare it with your expected overnight lows. A bag rated for mild nights will not carry you through a frost.
For backpacks, load it with about the weight you'll carry. Then check:
- Shoulder straps for fraying
- Load-bearing straps and buckles for cracks
- Stitching at stress points
- Pack fit across your hips and shoulders
A common mistake is testing a pack empty. Straps only show weakness under load.
How to Check If a Tent Is Waterproof Before You Leave
You can test tent waterproofing at home in about ten minutes. Pitch the tent fully, pegs and guy ropes included, then spray the fly with a garden hose for several minutes. Watch the inner walls.
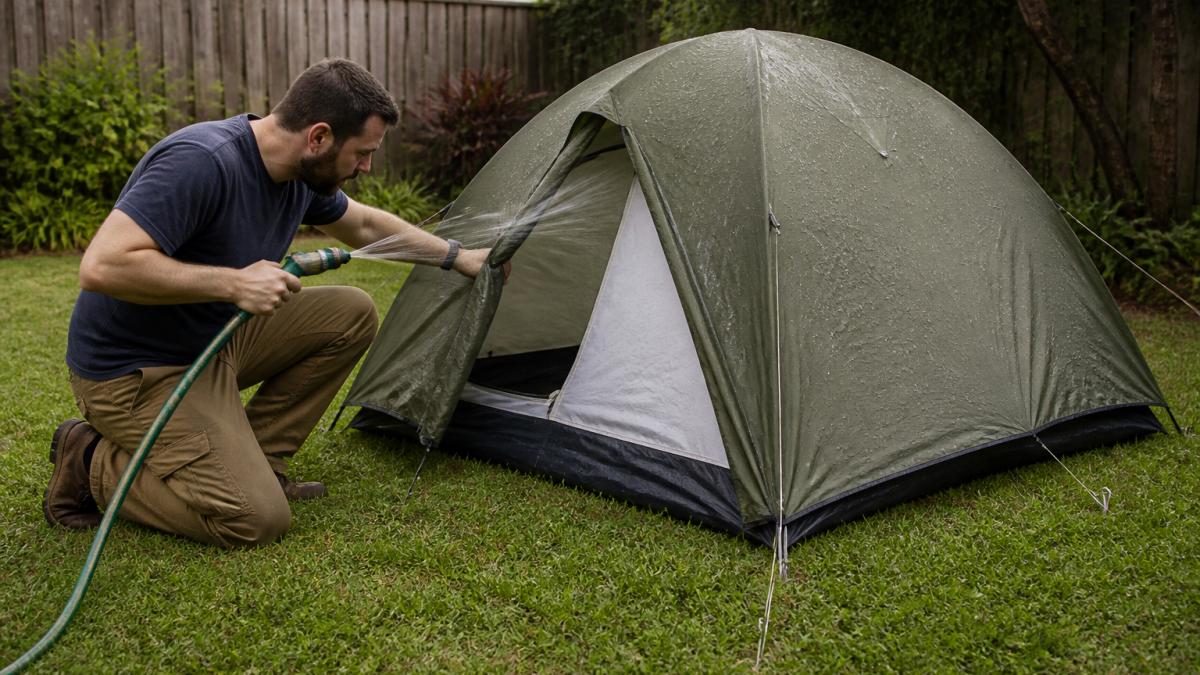
Pay close attention to seams, corners and the floor. Any damp patch inside is a fail. Dry the tent completely before packing.
A tent's fabric rating tells you a lot here. Our Weisshorn 4 Person Camping Tent uses 190T polyester with a PU3000mm coating, which gives you a useful benchmark to compare against. Higher numbers mean more water resistance.

How to Test Sleeping Bag Warmth at Home
Learning how to test sleeping bag warmth starts with one honest question: what will the overnight temperature actually be? Match that number to the bag's rating, then test.
Here is a simple home method:
- Lay the bag flat and let it loft for an hour.
- Check for thin, flat patches, which are cold spots.
- Sleep in it on a cool night with a known thermometer nearby.
- Note whether you feel cold at your feet, hips or shoulders first.
If you feel chill in a mild test, the bag will fail in real cold. Our Weisshorn Sleeping Bag uses 300g/m² hollow fibre filling for insulation and comfort. Check the comfort rating against your trip conditions before you commit.
Weisshorn Instant Up Camping Tent 4-5 Person Pop up Tents Family Hiking Beach →
How to Test a Camping Stove Safely
Testing how to test a camping stove means testing outside, never indoors. Set the stove on a flat, stable surface in open air, well away from tents, dry grass and anything flammable. A common pattern is to run this test at least a week before a trip so there is time to replace a failed hose or seal.
Work through the stove in this order, and treat each step as a pass or fail:
- Hose and seals. Flex the hose along its full length and look for cracks, stiffness or fraying at the crimp joints. Check the O-ring or seal at the stove-to-canister connection for flattening, nicks or grit. A cracked hose or flattened seal is a fail, do not light the stove.
- Leak check. Connect the gas canister and listen at the joints. A faint hiss, or a soapy-water bubble that grows at the connection, means a leak. Tighten the connection by hand only, never with tools, and retest. If the leak persists, stop and replace the seal.
- Flame test. Light the stove and watch the flame for a full minute. A steady blue flame with a visible inner cone is a pass. A yellow, lazy or pulsing flame, or one that lifts off the burner, signals a blocked jet, wrong canister or failing regulator, turn it off and check the connections again.
- Simmer and full-power check. Turn the control from full power down to a simmer and back. The flame should respond smoothly without flaring or dying. A control that sticks or jumps is a fail.
- Stability check. With a pot filled to the weight you would actually carry, set it on the burner and give it a gentle nudge. A stove that tips or rocks under a loaded pot is unsafe on uneven ground.
For liquid-fuel stoves, add a check of the pump cup and fuel line for cracks, and confirm the fuel bottle cap seals without weeping. For multi-burner camp stoves, test each burner independently before testing them together.
Record the result against your pass/fail rules: a pass means no leaks, a steady blue flame, smooth control and a stable base. A repair covers a single worn seal or a loose connection. A cracked hose, a seized control valve or a leaking fuel bottle is a replace.
Simulating Rain, Cold and Loaded Use in Your Backyard
The backyard is the best test lab you have, but only if you run controlled tests with clear limits. A common pattern is to simulate one condition at a time, record what you see, and stop the test as soon as a fail appears. Do this at least a week before your trip so there is time to repair or replace anything that fails.
Rain simulation
Pitch the tent fully, pegs and guy ropes included, and spray the fly with a garden hose for several minutes from a distance of about a metre. Work from the top down and let the water bead and run rather than forcing it through the fabric with a hard, direct blast. Watch the inner walls, seams, corners and floor for damp patches. Any damp patch inside is a fail. Dry the tent completely before packing.
Limitations: a hose cannot reproduce wind-driven rain or sustained downpour. Treat a pass as evidence the coating and seam tape are intact, not a guarantee for a storm.
Cold simulation
Sleep in the bag on a cool night with a thermometer beside you, and note the overnight low. Wear the same base layers you would wear on the trip. Record where you feel chill first, feet, hips or shoulders, because that points to thin insulation or a poor fit. If you feel cold in a mild test, the bag will fail in real cold. Do not push a cold test to the point of shivering or discomfort; stop and go inside.
Limitations: a backyard is sheltered and warmer than a exposed campsite. Use the result to compare bags and spot cold spots, not to certify a temperature rating.
Loaded-use simulation
Fill your pack with about the weight you will actually carry, then walk laps of the yard for 15 to 20 minutes. Check shoulder straps for fraying, load-bearing straps and buckles for cracks, stitching at stress points, and any rubbing at the hips and shoulders. A pack that rubs or sags under load at home will do the same on the trail. Test the pack empty only as a baseline; straps show weakness under load.
Limitations: flat ground and short laps will not reveal downhill instability or long-day fatigue. Use the test to catch structural faults, not to judge multi-day comfort.
If a test fails, decide before the trip whether the item is field-repairable, needs a replacement, or is a warranty matter. A last-minute failure at the trailhead leaves you with no options.
Setting Pass/Fail Criteria: Repair, Replace or Warranty
Decide your rules before you inspect. That stops you talking yourself into taking damaged gear.
Use these benchmarks:
- Pass: no holes, seams hold water, zips run smooth, straps intact
- Repair: small holes, lifting seam tape, one worn buckle
- Replace: cracked poles, torn shell fabric, failed insulation
- Warranty: manufacturing faults like split seams or broken connectors on new gear
Our Weisshorn 6 Person Camping Tent and Weisshorn Instant Up Tent both use strong frames and water-resistant fabric, which gives you a fair baseline when judging wear.


Frequently Asked Questions
How do you test camping gear before a trip?
Pitch every item at home at least a week before you leave. Set up the tent and spray the fly with a hose for two minutes, checking the inner walls for damp patches. Inflate or unroll your sleeping bag and lie in it for 20 minutes. Fire the stove outdoors and watch the flame for a steady blue burn. Load your pack with the weight you plan to carry and walk around for 15 minutes. Anything that fails gets repaired, replaced or left behind before you drive off.
How can you check whether a tent is waterproof?
Pitch the tent fully, including the fly and pegs, then run a hose over the roof and seams for two to three minutes. Look inside for beads of water, dark patches on the fabric or drips at the seams. Pay close attention to the floor corners and the seam tape above the door. A tent rated PU3000mm, like the Weisshorn range, should shed a garden hose test easily. If water seeps through, re-proof the seams with a seam sealer before your trip.
How do you test a sleeping bag for warmth?
Check the temperature rating on the label first, then test it in practice. Sleep in the bag on your usual mat in a cold room or your backyard on a cool night, wearing the layers you would actually wear. Note whether cold spots appear at the shoulders, feet or where the insulation compresses under your body. A bag rated to 5 degrees should keep you comfortable on mild nights. If you feel chill within 20 minutes, add a liner or choose a warmer bag.
How often should I inspect camping gear?
Run a full inspection before every trip and a deeper check at the end of each season. Tents, sleeping bags and packs take the most wear, so check seams, zippers and straps after every use. Stoves and fuel lines deserve a check before each outing. Store everything dry and loosely packed between trips, because damp storage causes mould, unusual odours and fabric breakdown. Replacing a $5 part early is far cheaper than discovering a failure at a remote campsite.
Gear you can trust starts with gear you've checked. If your inspection turns up a failure, or you're kitting out a new setup, Budget Roo Pty Ltd stocks durable camping, cooking and outdoor gear built for real trips. Browse our tents, sleeping bags and camp essentials, and head out knowing your equipment has already passed the test. Shop now.