

Table of Contents
- The Cost-Per-Use Test: When Cheap Camping Gear Wins
- How to Calculate Cost-Per-Use Before You Buy
- What to Spend On vs What to Save On
- Camping Gear Checklist for Beginners: Starter Kit Under $700
- How to Choose a Reliable Camping Tent on a Budget
- The Hidden Cost of Disposable Gear
- Camping Gear Maintenance Tips That Double Its Lifespan
- Buying Second-Hand: Where to Look and What to Avoid
- Verdict: Cheap Camping Gear Is Worth It When You Know the Trade-Offs
- Frequently Asked Questions
Last Updated: September 11, 2026
The Cost-Per-Use Test: When Cheap Camping Gear Wins
Cheap camping gear is worth it when its cost-per-use beats the expensive alternative over the life of the item. That calculation separates a smart budget buy from a false economy, the test this guide applies to every category of kit.
A $100 sleeping bag used on twenty trips costs $5 per night. A $400 bag used twice a year for five years costs $40 per night. The cheaper bag wins on pure economics, provided it survives the trips and keeps you warm.

Most "splurge vs save" advice skips that maths. Frequency, not price tag, decides whether cheap camping gear earns its place.
Below, we break down exactly when to spend, when to save, and how to run the numbers yourself.
How to Calculate Cost-Per-Use Before You Buy
Cost-per-use is the purchase price divided by the nights you expect to use the item. A $216.95 tent used ten nights a year for five years works out to roughly $4.34 per night, compare that figure, not the sticker price.
Run the calculation before every significant purchase:
- Estimate realistic nights per year. Be honest. Most casual campers manage four to eight.
- Estimate the item's lifespan. Budget gear often lasts three to five years with care; premium gear can last ten or more.
- Divide price by total expected uses. Price ÷ (nights per year × years of life).
- Factor in failure cost. A leaking tent on a wet night has a cost beyond money.
The framework exposes overpriced gear for occasional campers and bargains for frequent ones. A common mistake is buying expedition-grade equipment for two trips a year.
What to Spend On vs What to Save On
Spend more on the gear between you and the ground, and save on everything else. Shelter, sleeping system and insulation protect comfort and safety; cooking gear, lighting and furniture are far more forgiving of a budget.
The Gear Worth Paying More For
Prioritise these three categories:
- Sleeping system. Insulation performance degrades with poor materials. A bag rated to 5 degrees that performs as expected is worth more than a bargain that claims the same rating (iso.org).
- Shelter. Waterproofing, pole strength and seam quality determine whether a tent survives a storm. This is where material quality shows.
- Footwear and base layers. Wet feet and a cold base layer ruin trips faster than any other failure.
Where Budget Options Make Sense
Cooking equipment, camp lighting, storage crates, chairs and basic tools rarely justify premium pricing. A budget gas oven with even cooking performance does the same job as a costly one, look for solid construction, not brand prestige.
Camping Gear Checklist for Beginners: Starter Kit Under $700
A complete beginner kit can be assembled for under $700 without sacrificing reliability. Allocate spend toward shelter and sleep, fill gaps with budget-friendly options, and run each line item through the cost-per-use test.
| Item | Budget Pick | Approx. Price | Priority | Cost-Per-Use (10 nights/yr, 4 yrs) |
|---|---|---|---|---|
| Tent (4 person) | Weisshorn Family Camping Tent | $102.95 | Essential | ~$2.57/night |
| Sleeping bag | Weisshorn 5 Degree Sleeping Bag | $101.95 | Essential | ~$2.55/night |
| Sleeping mat | Foam or self-inflating | $40-$60 | Essential | ~$1.00-$1.50/night |
| Cooking stove | Portable gas stove | $40-$60 | Essential | ~$1.00-$1.50/night |
| Lighting | LED lantern and headlamp | $30-$50 | Essential | ~$0.75-$1.25/night |
| Chair | Folding camp chair | $30-$50 | Comfort | ~$0.75-$1.25/night |
| Cooler | Soft or hard cooler | $50-$80 | Comfort | ~$1.25-$2.00/night |
| Cookware | Basic pot and pan set | $40-$60 | Essential | ~$1.00-$1.50/night |
That leaves room to upgrade a single item later once you know how you actually camp. Our Weisshorn Family Camping Tent 4 Person Hiking Beach Tents Green is a sensible starting point: water-resistant and UV resistant 190T polyester rainfly with double layered fabric construction, a cross pole frame structure for additional strength, ease of setup as well as providing more headroom and shoulder space inside the tent, and free shipping.

Which Line Items Are False Economies
Not every cheap item is a smart buy. Three categories punish budget shoppers hardest:
- Sleeping mats under $30. Closed-cell foam is fine, but ultra-cheap inflatable mats puncture at the valve and lose loft within a season. A $25 mat that fails after three trips costs more per night than a $60 self-inflating mat lasting four years.
- Gas stoves with non-standard fittings. A $35 stove that only accepts one proprietary canister brand locks you into expensive refills. Check that the stove takes standard butane or LPG canisters before buying.
- Tents with taped seams only. Taping degrades in UV. A tent with taped and stitched seams, or one you can re-seal yourself, survives longer in Australian sun.
Repairability: The Hidden Column in Every Checklist
Before adding any item to your kit, ask: can I fix this myself? Repairable gear stretches its cost-per-use dramatically.
- Tents. Look for replaceable poles (fibreglass sections sold individually), a re-sealable rainfly, and a floor you can patch with a standard repair kit. Avoid fully welded, sealed units with no seam access.
- Sleeping bags. A bag with a replaceable zip and a re-proofable shell beats a sealed bargain. Down bags can be re-lofted; cheap synthetic bags generally cannot.
- Stoves. A stove with a cleanable jet and a replaceable O-ring will outlast a sealed unit. Carry a spare O-ring, they cost a few dollars and fail first.
- Chairs and tables. Look for bolted, not riveted, joints. A chair you can tighten with an Allen key lasts seasons longer than one with pressed rivets.
Experienced campers buy the cheapest item in a category only when it is repairable, and spend up when it is not. That rule prevents most of the replacement cycle that makes cheap gear a false economy.
Where to Spend the Upgrade Budget First
Once you have camped a few times, upgrade in this order:
- Sleeping mat, the single biggest comfort gain per dollar for most beginners.
- Sleeping bag, only if you camp in cold conditions; otherwise the budget bag is fine.
- Tent, only if you camp in wind or heavy rain, or need more space.
- Everything else, upgrade last, or never.
How to Choose a Reliable Camping Tent on a Budget
A reliable budget tent needs three things: a waterproof rating that matches your conditions, poles that won't snap in wind, and a packed size you can carry. Get those right and price becomes secondary.
Waterproofing, Pole Material and Packability
Check the rainfly fabric and seam sealing first. Double-layered 190T polyester with a water-resistant, UV-resistant coating handles most conditions; cross-pole frames add strength and headroom, and fibreglass poles keep weight and cost down. outdoor kitchen cost.
Packability decides whether the tent comes on every trip or stays in the garage. A pop-up design removes setup frustration entirely; the Weisshorn Instant Up Camping Tent pitches in under a minute by one person.

The Hidden Cost of Disposable Gear
Disposable gear carries a cost the price tag never shows. Cheap items that fail after a season get replaced, and the replacement cycle quietly costs more than buying one durable item once.
There is an environmental dimension too. Discarded tents, broken chairs and split sleeping bags end up as landfill, and most are not designed for repair. The Australian Government's recycling and waste guidance explains how textile and mixed-material waste is managed, and camping gear falls squarely into the hard-to-recycle category.
The practical answer is not to avoid cheap camping gear. It is to buy cheap gear that is repairable and built from materials that last more than a single season.
Camping Gear Maintenance Tips That Double Its Lifespan
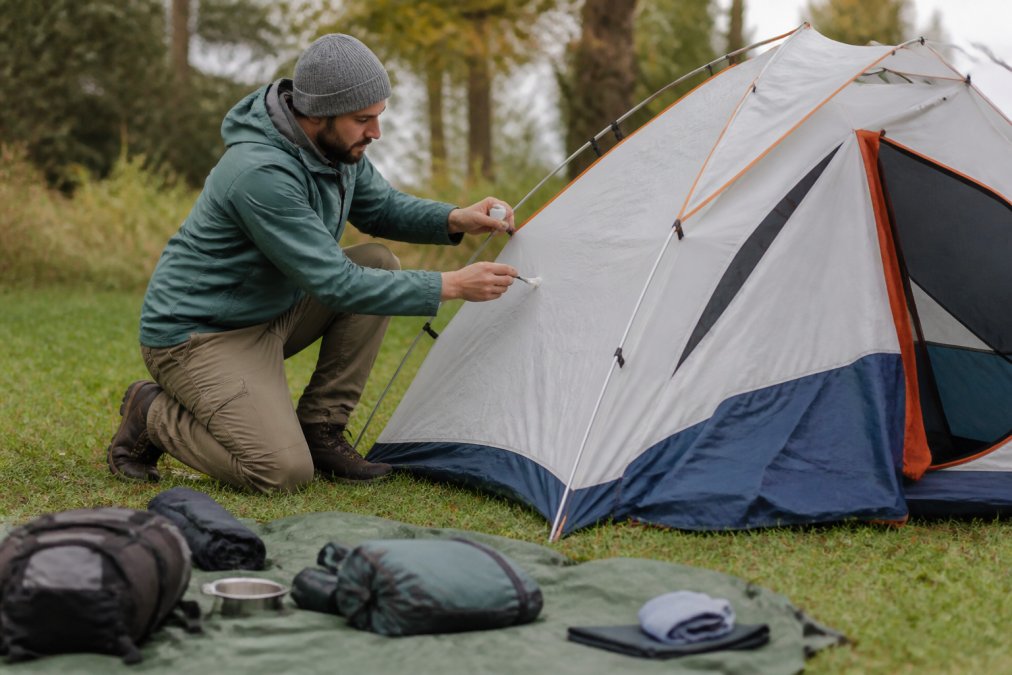
Basic maintenance is the cheapest way to extend gear life, and it takes minutes per trip. Most premature failures trace back to storage and cleaning habits, not manufacturing defects, so the money you save on cheap gear can be protected by a routine you can run in an afternoon.
The Maintenance Routine That Actually Pays
Follow these habits, in order of impact on cost-per-use:
- Dry before storing. Pack a damp tent or bag away and mildew sets in within days. Air everything fully at home. A mildewed tent can lose waterproofing permanently.
- Clean zips and poles. Grit wears zips and jams poles. A soft brush and a light silicone spray solve both; silicone spray costs under $15 and extends every zip on your kit by years.
- Re-seal seams annually. Seam sealant is inexpensive and restores waterproofing for another season. On a $100 tent, a $15 tube buys another two to three years of use, a cost-per-use improvement of roughly 50%.
- Store loosely. Compress sleeping bags only when travelling. Long-term compression kills insulation loft, and loft is the only thing a sleeping bag does.
- Patch immediately. A ten-minute repair now prevents a replacement purchase later.
DIY Repairs That Extend Cheap Gear by Years
This is where budget gear earns its keep. Cheap gear is often more repairable than premium gear, because it uses standard components rather than proprietary sealed units. Four repairs cover most failures:
- Tent pole splint. A snapped fibreglass pole section can be sleeved with an aluminium splint (a few dollars) and taped. The repair is permanent enough to finish the trip and cheap enough to repeat. Carry a splint in your repair kit.
- Seam re-sealing. Turn the tent inside out, brush seam sealant along every stitched seam, and let it cure for 24 hours. Do this once a year and a budget tent will outlast a neglected premium one.
- Sleeping bag re-lofting. Synthetic bags lose loft with compression and sweat. Wash per the label (usually a gentle cycle with non-detergent soap), tumble dry on low with a clean tennis ball to break up clumps, and the bag regains most of its loft, free, and worth two seasons.
- Zip replacement. A failed zip does not mean a failed tent or bag. A local repairer or a basic sewing machine can replace a zip for a fraction of replacement cost. Check the zip before the fabric fails, a stiff zip is the warning sign.
What Not to Bother Repairing
Some failures are not worth fixing, and knowing which saves money and frustration:
- Delaminated tent floors. Once the coating peels, the floor is done. No patch holds reliably.
- Cracked stove bodies. A cracked cast-metal stove body is a safety risk, not a repair job.
- Mouldy sleeping bags. Mildew in insulation cannot be removed without destroying the loft. Replace.
- Riveted chair joints that have pulled through. The fabric has usually torn around the rivet; a repair will fail at the same point.
The Cost-Per-Use Payoff
Run the numbers on a $100 tent used ten nights a year. Without maintenance it lasts three years: about $3.33 per night. With annual seam sealing, dry storage and one pole splint it lasts six years: about $1.67 per night. Maintenance costs roughly $30 over that period, less than a third of a replacement tent, and it halves your cost per night.
That is a mechanism that can make cheap camping gear worth it. The gear is not the only saving; the maintenance is also a factor.
Buying Second-Hand: Where to Look and What to Avoid
The second-hand market is the strongest value play in camping gear, provided you inspect before you pay. Quality gear from previous seasons often sells for a fraction of retail while retaining most of its working life.
Inspect these before committing:
- Tent seams and floor. Look for delamination, pinholes and repaired tears.
- Sleeping bag loft. A bag that no longer lofts has lost its insulation value.
- Pole integrity. Flex each pole section; cracks show as white stress marks.
- Zips. Run every zip fully open and closed twice.
Avoid anything stored wet, anything with a strong musty smell, and gear missing critical parts like pegs or stuff sacks. For broader safety context on outdoor preparation, the Bureau of Meteorology outlook and warnings is worth checking before any trip.
Verdict: Cheap Camping Gear Is Worth It When You Know the Trade-Offs
Cheap camping gear is worth it when the cost-per-use works and the item survives its expected lifespan. It is not worth it when the saving comes from materials that fail after one season or designs that cannot be repaired.
The formula is straightforward: spend on shelter, sleep and insulation; save on cooking, lighting and comfort extras; maintain everything; and buy second-hand where condition allows. Applied consistently, it keeps a full kit under $700 and still delivers reliable performance in the field.
Frequently Asked Questions
Which camping items should you never buy cheap?
Sleeping bags and shelter are the two categories where budget gear fails fastest. A cheap sleeping bag loses loft after a few washes and won't hold its temperature rating, while a low-cost tent can leak through seams in heavy rain. Look for hollow-fibre filling around 300g/m² and double-layer polyester with taped seams. Spending a bit more here prevents a cold, wet night that ruins the whole trip.
How do I know if cheap camping gear is actually low quality?
Check three things: stitching, zips and waterproofing. Loose or single-stitched seams pull apart under tension. Plastic zips jam when grit gets in. Untaped seams leak even if the fabric is labelled water-resistant. Also weigh the item. Gear that feels unusually light for its size often uses thinner fabric that punctures on the first rocky campsite.
How can I save money on high-quality camping equipment?
Buy off-season, look for end-of-line colours, and shop second-hand for hard goods like tents and camp chairs where wear is visible. Use a cost-per-use calculation: a $217 tent used 20 nights costs $10.85 per night, which beats renting at $30 to $50 per trip. Focus your budget on the items you use every trip and save on occasional-use gear.
How do I maintain budget camping gear to make it last longer?
Reproof tent flys every season with a spray-on DWR treatment. Store sleeping bags loose, never compressed, so the filling keeps its loft. Clean zips with a soft brush and apply silicone lubricant. Dry everything completely before packing away to stop mould. Patch small tears immediately with repair tape. These habits can add years to entry-level gear and protect your original investment.
The challenge is not finding cheap gear, it is finding cheap gear that lasts. Budget Roo Pty Ltd stocks camping, cooking and clothing equipment built for exactly that balance, from the Weisshorn family tent range to sleeping bags with genuine insulation ratings and camp ovens that cook evenly. Shop Now and get kitted out for your next trip without paying premium prices for gear you will only use twice a year.